- Overview
- Consolidate inventory transactions before purging
- Set up an archive task
- Display the status
- Display historical data
Overview
This post explains how to archive inventory transactions from Dynamics 365 Supply Chain Management.
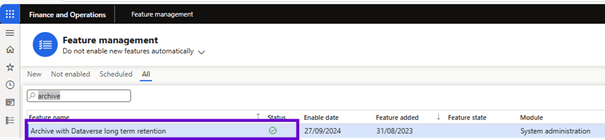
Archive with Dataverse long-term retention feature optimizes storage and system performance by moving InventTransArchive records to a Microsoft Azure data lake and replicating corresponding records in the InventTransArchiveHistory table. InventTransArchive table records represent inventory transactions that have already been consolidated.
Prerequisites
Before you can use this feature, you must enable it for your system and consolidate the transactions that you want to archive.
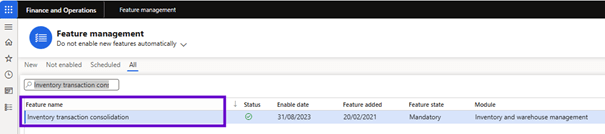
- Inventory transaction consolidation: This feature consolidates inventory transactions by moving them from an InventTrans table to InventTransArchive table.

- Archive with Dataverse long term retention: this feature moves archived inventory transactions from the InventTransArchive table to the Dataverse Long-Term Retention and replicates data in the InventTransArchiveHistory table.
Considerations before completing inventory transactions
- The Inventory Transaction Consolidation feature undo is not available for records of purged inventory transactions.
- The purge activity is not available from Dataverse’s long-term retention to Supply Chain Management.
Consolidate inventory transactions before purging
The purge operation can only move consolidated transaction records.
The inventory transaction table (InventTrans) will continue to grow and consume more database space. Therefore, the requests made on the table will gradually become slower.
You can use the inventory transaction consolidation feature to consolidate inventory transaction data to improve system performance.
Only financially updated stock transactions can be consolidated in selected closed ledger period. To be consolidated, financially updated outgoing stock transactions must have an exit status of Sold and incoming stock transactions must have a receipt status of Purchased.
When you consolidate stock transactions, all associated transactions are moved to the InventTransArchive table. Inventory issue transactions and inventory receipt transactions are consolidated separately, based on the combination of item ID (itemId) and stock dimension ID (inventDimId), and they are placed in the summarized issue and summarized receipt transactions.
If an item of the inventDimId combination contains only one receipt or issue transaction, the transaction will not be consolidated.
After consolidating your inventory transactions, you can further optimize storage and system performance by using the Archive with Dataverse long-term retention feature to move InventTransArchive records to a Microsoft Azure data lake.
Enable the feature on your system
Enable the Inventory transaction consolidation feature. This feature cannot be disabled after it has been enabled.
Considerations before
Before consolidating stock transactions, you should consider the following business scenarios as they will be affected by the transaction:
- When you audit inventory transactions from associated documents, such as purchase order lines, they are displayed as consolidated. To view consolidated transactions, you must go to Inventory management > Periodic tasks > Clean up > Inventory transaction consolidation.
- The closing of the inventory cannot be cancelled for consolidated periods.
- Standard cost conversion cannot be performed for consolidated periods.
- Inventory reports from inventory transactions are affected when you consolidate inventory transactions. These reports include the inventory aging report and inventory value reports.
- Inventory forecasts may be affected if they are executed during the time horizon of consolidated periods.
Prerequisites
Stock transactions can only be consolidated during periods when the following conditions are met:
- The ledger period must be closed.
- The closing of the inventory must be executed on or after the date of the consolidation period.
- The period must be at least one year prior to the beginning of the consolidation period.
- There must be no existing inventory recalculations.
Consolidate your inventory transactions
To consolidate inventory transactions, follow these steps.
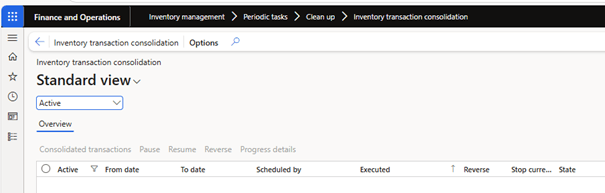
- Go to Inventory management > Periodic tasks > Clean up > Inventory transaction consolidation.
The Inventory Transactions Consolidation page displays and displays a list of consolidated process records.
- In the Actions pane, select Inventory transaction consolidation to create a consolidation of inventory transactions.
- In the Inventory transaction consolidation dialog box, in the Parameters FastTab, define the following fields:
- From date in closed ledger period: select the earliest transaction date to be included in the consolidation.
- To date in closed ledger period: select the most recent transaction date to be included in the consolidation.
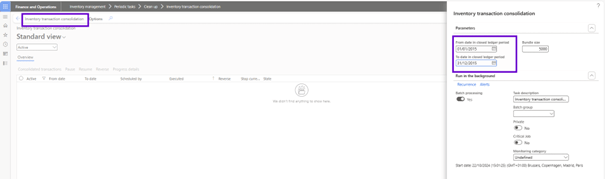
Only periods meeting the prerequisites will be available for selection.
- In the Run in Background FastTab, configure batch processing details as required. Follow the usual steps for batch jobs in Microsoft Dynamics 365 Supply Chain Management.
- Select OK.
- You will receive a message asking you to confirm that you wish to continue. Read the message carefully, then select Yes if you wish to continue.

You receive a message that your inventory Transactions Consolidation task is added to the batch queue. The task begins consolidating inventory transactions for the selected period.
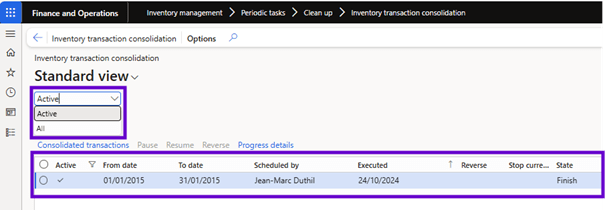
View consolidated inventory transactions
The Inventory transaction consolidation page displays your entire consolidation history. Each row of the grid displays information such as the date the consolidation was created, the user who created it and its status.
At the top of the page, select one of the following values to filter the consolidations displayed in the grid:
- Active: Only show active consolidations.
- All: View all consolidations.
For each consolidation, the following information is provided:
- Active: A check mark indicates that consolidation is active.
- From date: The earliest transaction date that can be included in the consolidation.
- To date: The most recent transaction date that can be included in the consolidation.
- •Scheduled by: The user account that created the consolidation.
- Executed: the date on which the consolidation was created.
- Stop the current update: A check mark indicates that consolidation is underway but has been suspended.
- State: The processing status of the consolidation.
The toolbar above the grid provides the following buttons to work with a selected consolidation:
- Consolidated transactions: View full details of the selected consolidation. The consolidated transactions page that appears displays all transactions in the consolidation.
Extend your code to support custom fields
If the InventTrans table contains one or more custom fields, you need to extend the code to support them, depending on how they are named.
- If the custom fields in the InventTrans table have the same field names as in the InventtransArchive table, it means they are mapped 1:1. Therefore, you can simply place the custom fields in the InventoryArchiveFields group of fields from the inventTrans table.
- If the custom field names in the InventTrans table do not match the field names in the InventtransArchive table, you must add code to map them: add extensions to InventTransArchiveProcessTasket InventArchiveSqlStatementHelper classes.
Set up an archive task
To move InventTransArchive records into Dataverse’s long-term retention, follow these steps.
- Go to Workspaces > Archive with Dataverse long term retention > Inventory transactions.
- Select New long term retention to open the Create Long-term Retention job wizard.

- Enter a name for the job and select Next.

- Select the period that has been processed by the inventory transaction consolidation feature, and then select Next.
- Enter the start date and time of the long-term preservation job, then select Next.
- Review the details of the work and create the long-term retention job.
You receive a message that the long-term retention task has been created. Archived records are purged on the scheduled date.
Display the status
To view the results of the long-term retention job, follow these steps.
- Go to Workspaces > Archive > Inventory Transactions.
- A list of long-term retention jobs is displayed. Select the task with the Task Status field set to Complete.
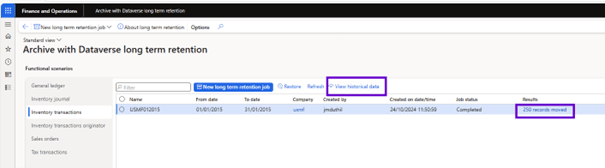
- Under Results, select the link.
- Display information on the progress of the inventory transaction archives.
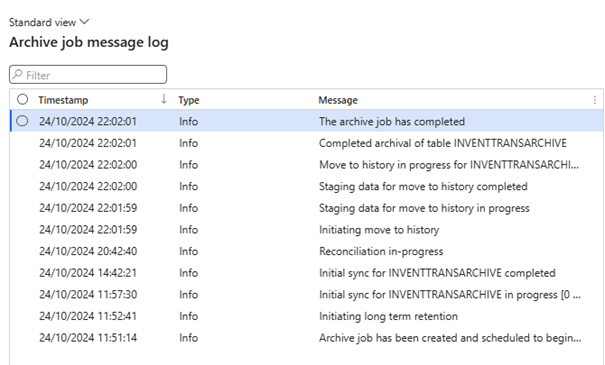
- Select View Detailed Logs to display the log of messages from the archive job. This journal describes in detail the stages of the long-term conservation job.
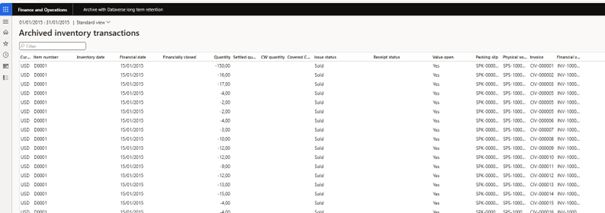
Display historical data
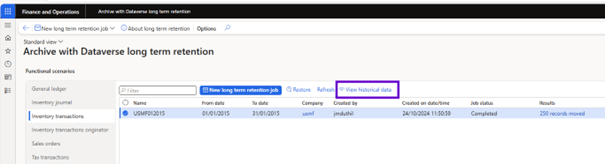
When the long-term retention task moves archived inventory transactions from InventTransArchive table to Dataverse long-term retention, the same data is replicated in InventTransArchiveHistory table. To display historical data in the InventTransArchiveHistory table, do the following.
- Go to Workspaces > Archive > Inventory Transactions.
- A list of long-term retention tasks job is displayed. Select the job with the job Status field set to Completed.
- Select Show Historical Data to display InventTransArchiveHistory table data.

Leave a comment