
Overview
So, there are three different scenarios that we have for an extension of existing data archival framework.
The very first one is about custom fields in out of box data archiving scenario. So, you have a custom column added in the sales line and sales table, you wanted to add those columns as part of your archiving process. And you want to get the data in the history table and in the Microsoft managed data lake.
Then we have another situation where it is not about adding a custom column to an existing table which is part of a data archiving scenario, it is about having a new table altogether as part of the existing archiving scenario. So, for example, you have sales table which is sales order archiving scenario which has around thirteen tables. Now you have one more table added in your business which is holding some data related to either sales table or sales line, and you want that to be added as part of your archiving of sales order.
And the third point that we have which is build your own customer scenario. You have a custom solution, custom module or probably an ISV, where everything is custom, and you want to have your own archiving scenario: actually, this scenario is not available (will be in a future release).
Custom fields
Add Fields in History Tables and BI Entity
For each archiving scenario Microsoft have set live tables which are the actual D365 Finance tables. And then against each live table they create a mapping history table. And then against each live tables history table we have a mapping bi entity which they are creating in D365 Finance. And then against those bi entities we will have a mapping Dataverse virtual entity.
So just think about an example of the sales order archiving process which has thirteen tables in it. So, you can see all the thirteen tables listed here and the map and the mapped history tables. And you can also see the map bi entities and the Dataverse virtual entity. We are doing one by one mapping. So, thirteen tables in sales order archival scenario, we have thirteen bi entities and thirteen history tables.

When we are going to plug in a custom column, we need to figure out all the list of tables that I have here. I need to figure out all the extents and customization or the new column that I have added in these tables. I need to make those tables available in all this theory mapping artifact that we have.
In the sales line you added two extra columns and those columns you want to be added as part of the archiving process. Make sure that these two columns being added into the history table: a SQL script has been created by Microsoft to validate how many new columns that you have added in the 13 existing tables: validate archive table schema script.
In the history table you do not need to add the system column present in live table: SysRowVersion and SysDataState columns are added by the platform these columns do not have to be added to the history tables.
There is no automation for this process, and you need to do it manually: difficult for Microsoft to find the custom column as you need to create those columns in extension, you need to define model where you wanted to add those extension and all the dependencies. So, automation of that piece is not going to be that easy for Microsoft.
If you have a gap between your live table columns and the history table columns, if you try to schedule that archival scenario, it will error out because there is a missing column. So, create an extension of your history table and add those mapping columns.
Now you need to add those columns and custom fields in your Bi entity. Each table in archiving scenario is mapped with one Bi entity. Microsoft are doing one by one mapping to make it simpler for the data copy from D365 Finance to history and from history to the Microsoft managed because if you have a complex entity, it might take any turn performance.
So, any table that you have customized, and you have a custom column, make sure that corresponding history, you get an extension, add those columns, then make sure create extension to the existing bi entity and add those custom columns.
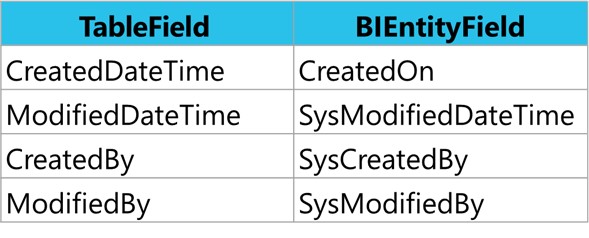
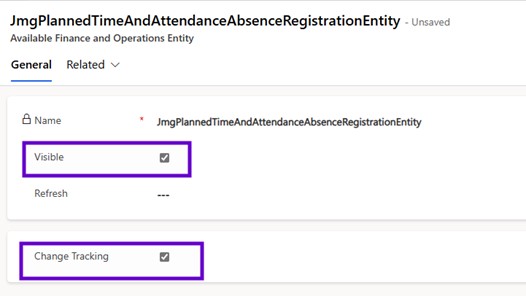
Last point concerning properties on tables, on the live tables, you have turned on or even Microsoft has turned on created date time, modified date time… you need to pay a little bit attention here is that you need to for history tables. Modify table properties through Table Extension on Corresponding History Table. In BI entity, you need to manually add those columns. Create Custom fields through Data Entity Extension using the following naming convention:
So, after that I just need to generate a build and deploy that particular change on the D365 Finance environment. So once that code is deployed to the sandbox, the next thing that I need to do is that since I modified my bi entity. I want to make sure that my virtual entity in the database is also being refreshed.
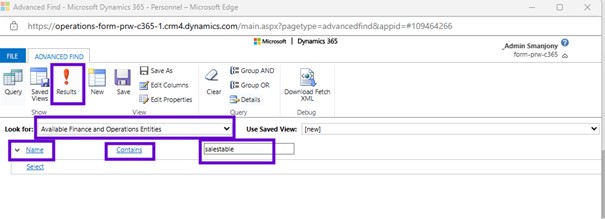
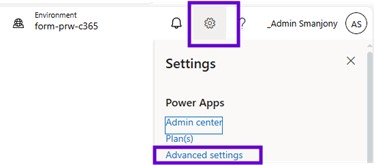
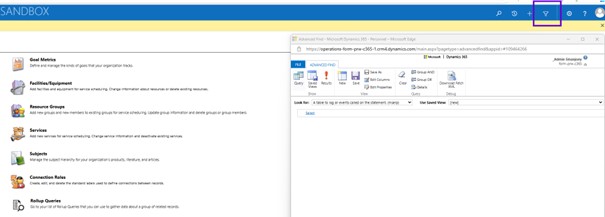
And for that, to refresh the virtual entity metadata, simply go to the maker portal, go to the setting gear. And within that setting here you will see an advanced setting. And in advanced setting there is an advanced find.


Select ‘Available finance and operations entities’ in the Look for drop-down then search for name of the Bi Entity need to be refreshed.
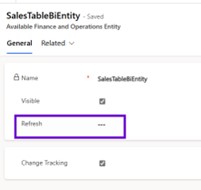
Here I got the sales table bi entity so let me click onto the sales table bi entity that will take me to another dialog that will allow me to perform the request of that the metadata for that virtual entity. So here that the checkbox is available, you just need to click onto the checkbox refresh and then save your change. This process will take little longer time because it is going to perform the metadata refresh in your database.
So, once you check it and save and close, what is going to do is that it is going to refresh the metadata from D365 Finance to virtual entity with all the changes that you have done by adding new columns.
Identification of custom fields
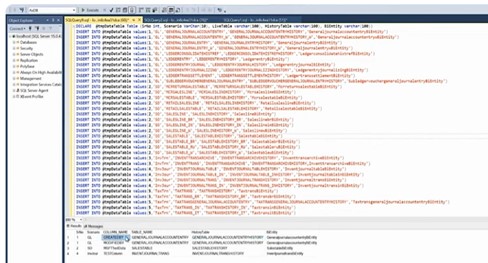
Use the script publish in the GitHub. You just need to open the file and copy the content and put it into the SQL server management studio. Microsoft has listed all the tables that are available in as of now that covers the data archive scenario that include GL, Sales Order, inventory transaction, inventory journal, tax trans. The total count is around thirty-eight tables. This list gets increased when Microsoft adds new scenarios. It will compare that with my live table in the history table and it gives the list of the old mismatch fields.
Add Custom Tables
I want to add that new table to the existing scenario. The very first thing that we need to do is create mapping history tables. So, what you need to do is create history tables against your custom tables, and map all the columns. Create a new history table that mirrors all fields from the corresponding live table.
There are two system columns on every live table, which is SysRowVersion and SysDataState that you do not need to add into the history tables because those are system columns used by archiving framework on the live table. We do not need to add those columns to the history table.
Do not mirror indexes from the live table in the history table (one or two indexes: cluster index on recid). We are moving the data from the live table to a history table, and we are still saving 80% of the space because index to data ratio. If you create many indexes in the history table, then we will kill the purpose.
Now I have the history table, the next thing that I need to do is to create my BI entity, against each table we have a history table and then we have a BI entity. I need to create a BI entity against my table and then mirror all the columns.
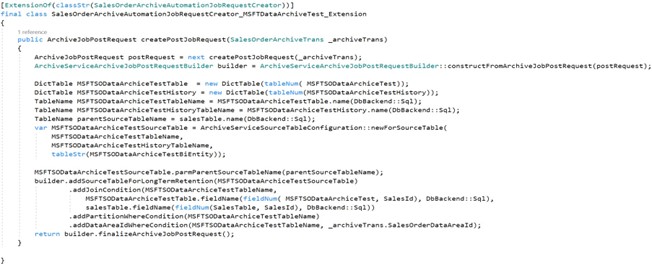
The next is to plug in these tables and entity in the existing scenario. There is a class that Microsoft uses for that archiving process which is ArchiveAutomationJobRequestCreator: Extend the class for a scenario to add the new table to data archive scenario. Here an example of code for sales order archive scenario:
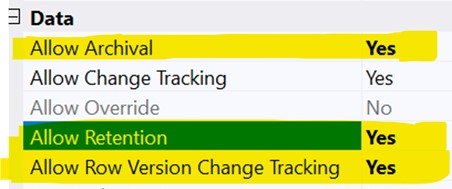
Last point concerning properties on tables, on the live tables there are two properties of the table metadata, which is called allow retention and allow archival. You need to enable those two properties. Then the other property which is called allow row version tracking that needs to be turned on table and the bi entity. That column gives us an opportunity and ability to move the data from sync by the data or changes incremental changes from your D365 Finance tables to Dataverse.
After the changes that have been made to the D365 Finance side, you just need to create a build. We may need to deploy that code onto your D365 Finance environment. And so that way that D365 Finance environment is up to date with my latest change. Now what about the Dataverse: since I have added a new bi entity in D365 Finance, I may need to generate a virtual entity.
So, need to follow the similar step about the request virtual entity in terms of go to the maker portal, use the setting here advanced setting and once find and you need to search for available finance and operation entities and it will give the entity that will appear, and just you need to tick the visible. So that way it is going to enable that the virtual entity into the Dataverse. So, I may need to tip that the change tracking is also been enabled into the Dataverse.
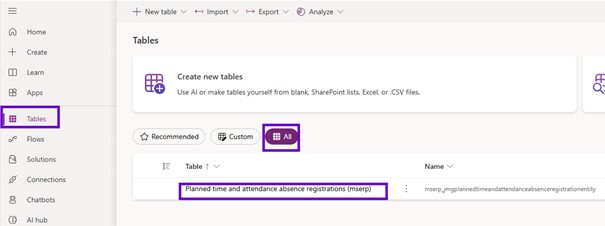
This process is going to once again take some time because it is going to generate the metadata property. Once the metadata is generated, you need to go to the tables, all tables and you may need to search for the entity that we have created.
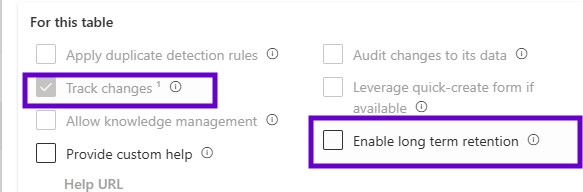
After that the entity was created into the Dataverse. There is one more additional property that needs to be set into the power platform into the maker portal and that enables long term retention.
So, you need to go to the make portal, tables, search for the tables or the virtual entity that we have added.
Then click onto the properties advanced options and you must make sure like change tracking is enabled and enable long term retention has also been enabled. Keep in mind, if this particular property has not been set, the system will not allow it and will not stop you from triggering that the job, but it will stop the archival process because these are the steps is going to perform into the Dataverse.
See data into the Microsoft Managed data Lake
So, to use that Microsoft managed data lake and to perform the inquiry on your data, the cold data that has been stored into the Microsoft managed data lake. You may need to use the Microsoft fabric.
So, to use that the Microsoft fabric, you must make sure that you have bought capacity using portal azure. The very first thing that you may need to make sure like the fabric capacity, it will have a region that like in that fabric capacities belong to that region and the region of the fabric capacity and the region of your Dataverse environment, it should be the same.
If there is a mismatch in the region of the Dataverse region and Dataverse environment that has been hosted and the public capacity system will give you that error message that you do not have appropriate that capacity public capacity to create a link.
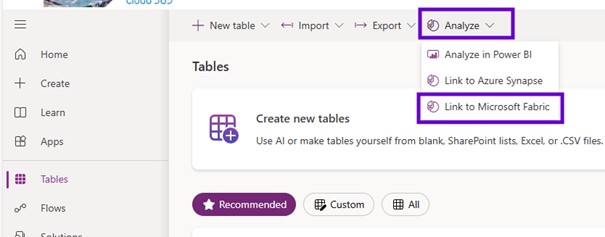
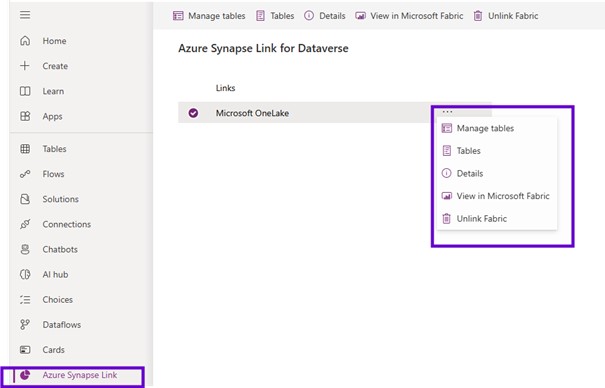
I created that link: you need to go to the maker portal one more time and using that maker portal very first thing you go to the tables and click on to the analyze and link to Microsoft fabric.
When you try to do that the link first time, it will open the result, and it will first of all check for the Microsoft fabric whether it is capacity has been available or not.
Once that wizard has been completed, you can use that you can come one more time into the tables, analyze and link to fabric and that will take you through to the power BI and specifically onto the lake house.
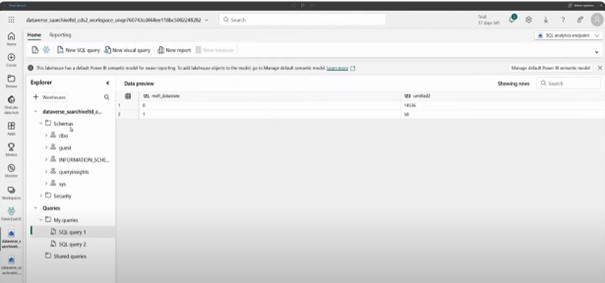
It is the shortcut that has been created for your data that has been stored in your data management data lake and it provides you with the table view like the table browser capability we have in D365 Finance. Here. It shows all the tables that MSERP underscores with a table named the BI entity. These are all the bi entities that have been available that have been published into the Microsoft managed data Lake.

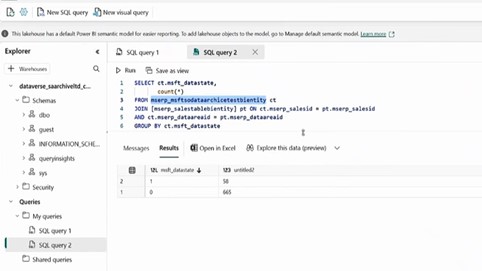
If you want to write some sort of complex queries or you wanted to have a query kind of the experience it has been available through SQL analytics endpoint.
So, when you create the link, it will create the Lake house semantic model and the SQL analytics endpoint using SQL analytics endpoint.
It will give you the similar the look and feel that we have into the SQL Server management studio. Using Microsoft fabric, you can run any kind of custom queries. You can create the custom queries the way you want. You can create a view for those custom queries and using those custom queries you will be able to create the power BI reports. And that way you can build your analytic story using the data that has been stored in managed data link.
If you just click onto the DBO schema. It tells you all the tables and then under the DBO you will have a view as well. It will allow you to create new views.

Leave a comment