
- Disable change tracking
- Enable set-based processing
- Create Data Migration batch group
- Priority-based batch scheduling
- Set maximum number of batch threads
- Import in batch mode
- Clean the staging tables
- Clean the data
- Configurations to test in data migration tests
- Recommendations to optimize Data Migration performance
Data migration is a key success factor in almost all implementations. One of the main concerns of some customers is the speed at which data can be migrated, especially when we have a large amount of data to migrate and a short cutover window. The Data Migration Framework is also used to move data for business requirements and operations.
As a reminder, test results obtained in a T1 environment should not be compared or extrapolated to performance in a sandbox environment of T2 or higher.
In addition, not all standard entities have been optimized for data migration. Some entities have been optimized for integration with the Open Data Protocol (OData), and if a requested entity cannot be optimized to meet performance requirements, I recommend that you create a new optimized entity.
Start the optimization phase using a subset of data. For example, if you need to import one million records, consider starting with 1,000 records and then increasing the number to 10,000 records and then 100,000 records.
After identifying the entities to use, you must go through the following chapters that are optimization opportunities.
Disable change tracking
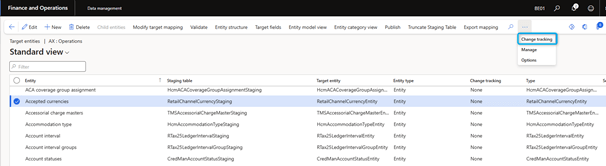
You can enable and disable change tracking from the entity list.
- In the Data Management workspace, select the Data Entities tile.
- On the Target Entities page, select the entity in the grid and then, in the Actions pane, on the Change Tracking tab, select Disable Change Tracking.

Enable set-based processing
Follow these steps to verify that an entity supports set-based processing.
1. In the Data Management workspace, select the Data Entities tile.
2. On the Target Entities page, search for the entity in the grid and review the value in the set-based processing column.

For an example of how to enable set-based processing for the General Journal entity:Importing vouchers by using the General journal entity – Finance & Operations | Dynamics 365 | Microsoft Learn.
Not all entities support set-based processing. For example, if you try to enable set-based processing support for the Customers Definitions entity ( CustCustomerBaseEntity ) and save your change, you will receive the following warning message: Set operations not supported for ‘Customer definitions’ entity.
Here are some important considerations if you need to create an entity that allows set-based processing:
- Data sources cannot be read-only.
- The ValidTimeStateEnabled property of the data entity view must be set to No .
- All data source tables must have the TableType property set to Regular .
- The QueryType property on the query used cannot be set to Union .
- The Main data source cannot prevent data from being save across companies. However, the Embedded data sources do.
- The main data source cannot prevent data from being saved to across partitions. However, the Embedded data sources allow for this.
Create Data Migration batch group
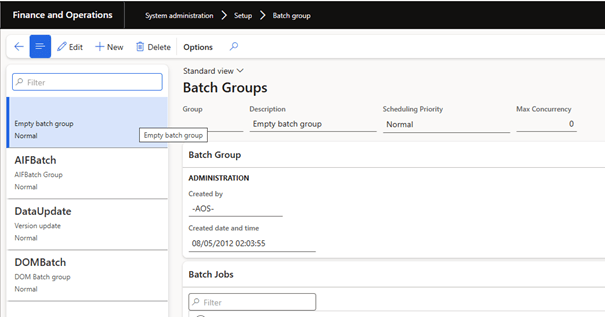
During the cutover, run data migration with little or no other activity. It may be useful to configure and use a batch group that most or all of the compute nodes are assigned to.
You can configure a batch group on the Batch Group page ( System Administration > Setup > Server configuration).
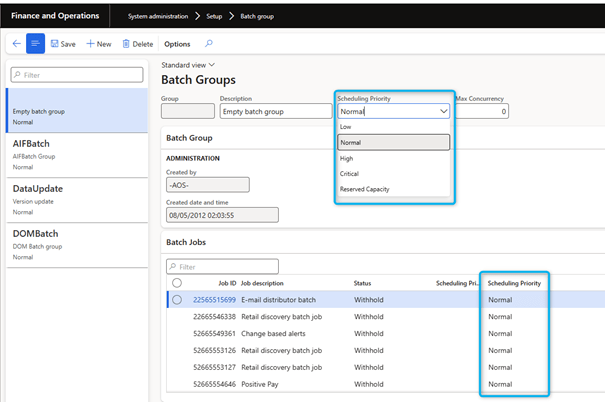
Priority-based batch scheduling
In platform update 31, the new priority-based batch scheduling feature optimizes batch hob execution: https://learn.microsoft.com/en-us/dynamics365/fin-ops-core/dev-itpro/sysadmin/priority-based-batch-scheduling. It is important to correctly set batches using this priority-based batch scheduling feature.
Set maximum number of batch threads
To make better use of parallelism and multithreading, you can configure the maximum number of threads per batch per instance of Application Object Server (AOS) by setting the Maximum batch threads field on the server configuration page (System administration > Setup > Server configuration). Be careful when changing the value of this field. Too high a value can have negative consequences on performance. Currently the default is 8. You can increase the value to 12 or 16. However, you should not set the field to a value greater than 16 unless you are performing important performance tests.

Import in batch mode
Every time you run an import job, make sure it is running in batch mode. Otherwise, only one thread is used to run the task. In this case, the system is not able to take full advantage of these optimization configurations.
Clean the staging tables
I recommend that you clean the staging tables. You can perform this optimization by scheduling the task Job history cleanup job: https://learn.microsoft.com/en-us/dynamics365/fin-ops-core/fin-ops/data-entities/data-import-export-job#job-history-cleanup. To schedule this job, select the Job history cleanup tile in the Data Management workspace.
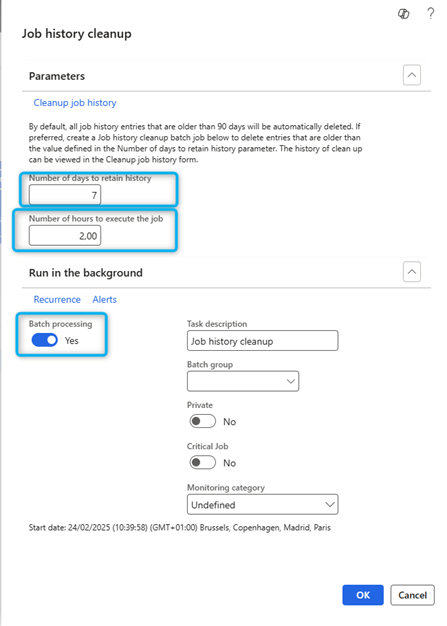
You must first enable the Execution history cleaning feature in the Feature Management workspace.

Clean the data
Time spent on validations and error reports increases the total migration time. Consider this when importing a large volume of invalid or inconsistent data. I recommend that you try to correct and reduce data quality errors. In this way, you help to avoid unnecessary validation and error handling runs.
Configurations to test in data migration tests
The following configurations may affect performance. Therefore, I recommend that you test the changes using different values suitable for your scenario.
Configure the entity run parameters
Follow these steps to change the executions parameters for all entities or specific entities.
- In the Data Management workspace, Parameters the Framework Parameters tile.
- On the Data Import/Export Framework Settings page, in the Entity Settings tab, select Configure Entity Executions Parameters.
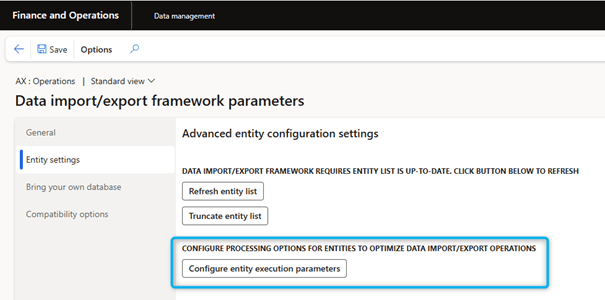
- On the Entity Import Exectuions Parameters page, set the Import threshold record count and Import task count fields according to the desired entities.

Import threshold record count
This value determines the number of records to be processed per thread. By changing the Import threshold record count, you can control how you want to split the import into smaller tasks.
Import task count
This field defines the number of threads used for the data migration job for a specific entity. For example, the Maximum batch threads for each server is set to 8 and four servers are assigned to the data migration batch group. In this case, the maximum total value of the Import task count field is 32 (= 8 4).
If a data entity does not support multithreading, you receive an error message when you try to configure the entity. For example:
A custom sequence is defined for the “Customers V3” entity, several tasks are not supported.
Validations
A validation logic for record insertions or updates may have been built into the system, or there may be a validation of individual fields. If the data migration is mature enough, the time spent on imports can be reduced by disabling this validation, if it can be disabled.
Follow these steps to change the settings for each entity.
- In the Data Management workspace, select the Data Entities tile.
- On the Target Entities page, select the entity in the grid and then, in the Actions pane, select Entity Structure .
- On the entity structure page, define the fields Run business validations and Run business logic in insert or update method as appropriate.

Run Business validations
If this check box is selected, the system runs any logic written in the validateWrite() method on the table. It also runs all associated event handlers.
Run business logic in insert or update method
If this check box is selected, the system executes any logic written in the insert() or update() method of the table. It also runs all associated event handlers.
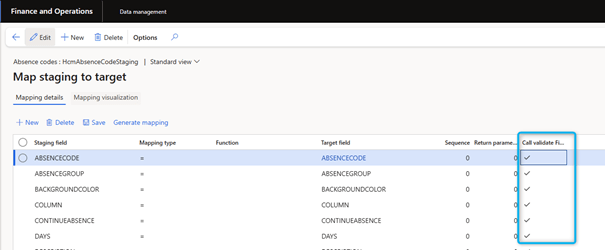
Call the validateField method on the target
Follow these steps to perform field validation.
- In the Data Management workspace, select the Data Entities tile.
- On the Target Entities page, select the entity in the grid and then, in the Actions pane, select Modify Target Mapping .
- On the Map staging to target page, Check Call validate Field method for the field for which validation is to be performed. The validateField(FieldId p1) method is then called for this field.
Recommendations to optimize Data Migration performance
Here are some general recommendations on the approach to optimize data migration performance:
- Split large files into smaller pieces. This approach gives the SQL optimizer time to determine whether a new query plan is optimal.
- Test performance in a suitable T2 or higher environment.
- Test the performance in a mock cutover before go-live.
The data migration performance test is an iterative process. I recommend that you collect and compare information on each test to determine the optimal configuration for a specific entity. You must collect and verify some of the following parameters:
- The batch group used
- The number of batch servers assigned to each batch group
- The maximum number of threads per batch per batch server
Here is an example of the information you could collect for each entity.
| Information | Description |
| Entity | The name of the entity that is being tested |
| Number of records | The number of records that are being imported |
| Source format | The source format of the data that is being imported |
| Change tracking disabled | Yes/No |
| Set-based processing | Yes/No |
| Import threshold record count | The number of records |
| Import task count | The number of tasks |
| Run business validations | Yes/No |
| Run business logic in insert or update method | Yes/No |
| Call validate Field method | Yes/No (potential field list) |
| Required performance | The amount of time that the import must be completed within to achieve the cutover window |
| Actual performance | The actual amount of time that was required to import records |

Leave a comment