
- Introduction
- Process
- Prerequisites
- Dynamics D365 Finance & Operation: Enable Process automation
- Dynamics D365 Finance & Operation: Setup
- Account reconciliation workspace
Introduction
This is a detailed, step by step guide on how to set up and use account reconciliation agents in Finance and operations.
The initial phase of reconciliation automation focuses on aligning sub ledgers with general ledger balances, replacing SSRS reports with a near-real-time system that alerts finance teams for issues. Each transaction offers solution options, such as adjusting account settings or recognizing changes in posting profiles. All actions are logged in an audit trail.
The first public preview included basic reconciliation automation but lacked solution recommendations. The second preview introduces an Account Reconciliation Agent that suggests actions for resolving exceptions. Over time, Copilot will learn from past resolutions to automate fixes, with all actions also tracked in an audit trail.
Process
Etape 1: Subledger to ledger reconciliation. The process begins by aligning subledger and general ledger balance.
Etape 2: Issue Detection. The system Identifies discrepancies in near real-time.
Etape 3: Solution recommendations. Suggested actions are provided for each issue such as adjusting account Settings.
Etape 4: Audit Trail logging. Every action and resolution are recorded for transparency.
Etape 5: Copilot learning. Overtime, Copilot learns from past resolutions to automate future reconciliations.
Prerequisites
Power Platform Link
Make sure that your Finance and operations environment is connected to Dataverse. In LCS verify in Power Platform Integration that you have an environment ID and Url:

Or in PPAC > Environments and select the environment used:
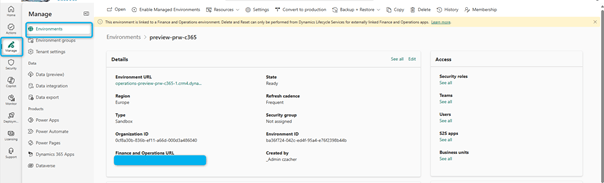
Normally you have an URL for Finance and Operation.
Dataverse setup
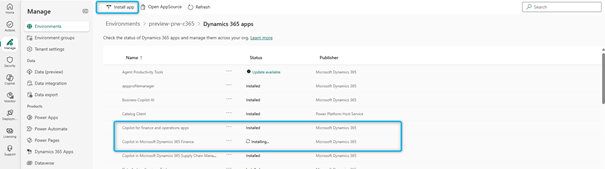
These two applications must be installed in Dataverse for your selected finance and operations environment:
- Copilot for finance and operations apps
- Copilot in Microsoft Dynamics 365 Finance
In PPAC > Environments and select the environment used, click on Resources and Dynamics 365 Apps:

And next click on Install app button:
Dynamics D365 Finance & Operation: Activate Feature
The following features need to be activated before going any further. In Feature Management Activate (Preview) Immersive Home

Next Activate (Production Ready Preview) Agent management:

Next Activate (Production Ready Preview) Account reconciliation agent:
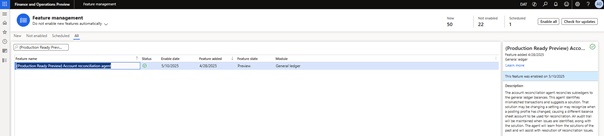
All these features are in Preview.
Set up agent identity users and assign security roles
Create agent identity user accounts in both Dataverse and Finance. The user accounts must have the following security roles:
- Required Dataverse user roles:
- Finance and Operations basic user.
- Account reconciliation agent role.
- Environment maker
- Required Finance user roles:
- Account reconciliation agent.
- System user
Dynamics D365 Finance & Operation: Enable Process automation
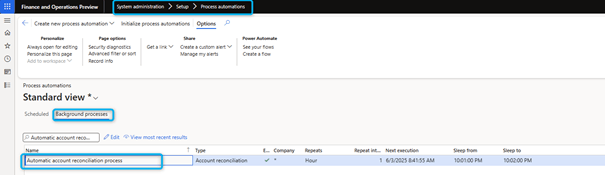
When activating the account reconciliation feature, this process will be activated by default. By default, this automation is set to run every 6 hours, feel free to adjust it following your requirement, but please do not set it to run every minute, which does not make much sense.
Dynamics D365 Finance & Operation: Setup
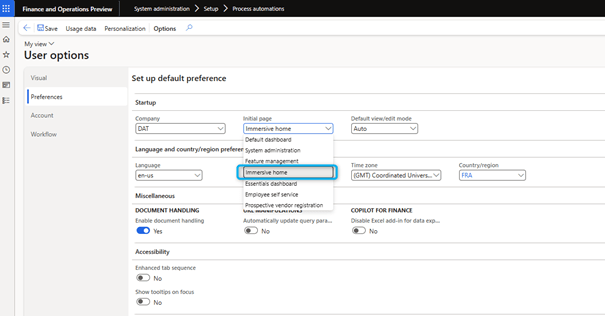
Immersive Home
- Go to the user options form.
- Select immersive home as the default home page.
- Save and refresh your current session.
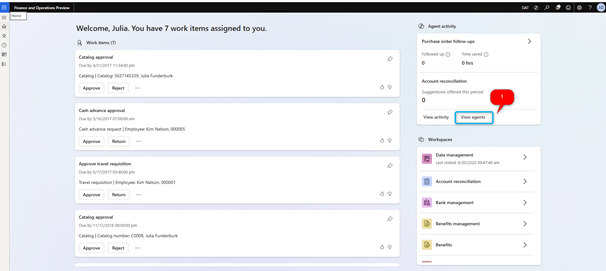
Account reconciliation template
There are a few ways to set up the account reconciliation template.
- On the immersive home page click on the “View agents” menu
- Select the <Library> tab.
- Locate the “Mitigation suggestions for account reconciliation” menu and click on the “Select” button.
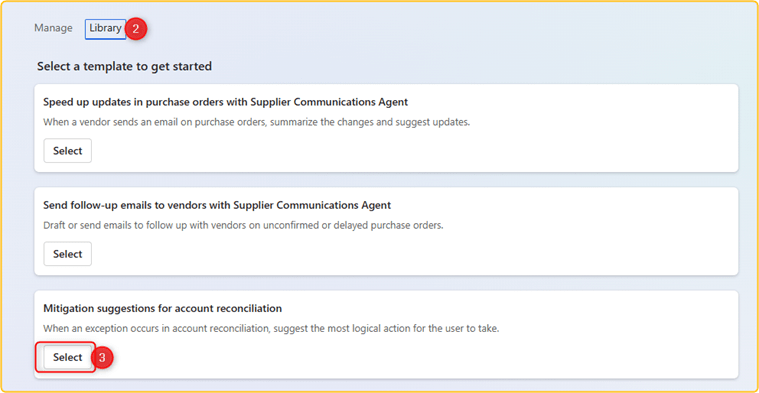
The process is up and running.

Account reconciliation workspace
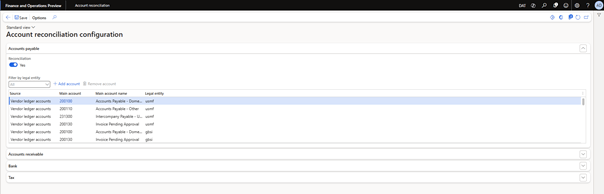
Account reconciliation configuration
To view the settings and configuration for the account reconciliation feature, use the Settings button (gear symbol) in the upper right of the workspace.

On the Account reconciliation configuration page, you can enable or disable the reconciliation processing for each module. In addition, you can view the accounts that are used for each module for each legal entity and add and remove accounts. The list of accounts is taken from the existing posting profile setup and the bank and tax account setup in each legal entity.
Use of Account reconciliation
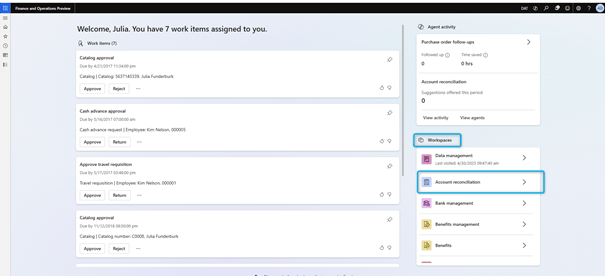
To access the account reconciliation workspace, click on the dedicated workspace menu on the immersive home page.
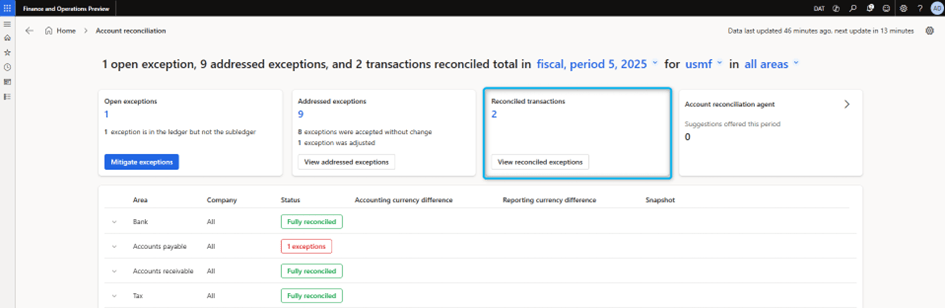
To open the Account reconciliation workspace, go to Workspaces > Account reconciliation. Tiles in the upper part of the workspace show summaries of open exceptions for the current period, addressed exceptions, automatically reconciled transactions, and agent-recommended actions. Use the filter options at the top of the workspace to adjust the data that is shown. For example, you can change from the current fiscal period to the previous fiscal period.
The grid in the lower part of the workspace shows details about each combination of a module (area) and a legal entity (company) that has transactional data for the selected period. If there are exceptions, the Status column shows the number of exceptions that must be addressed (in red). After all exceptions are addressed, the Status column shows a status of Fully reconciled (in green).
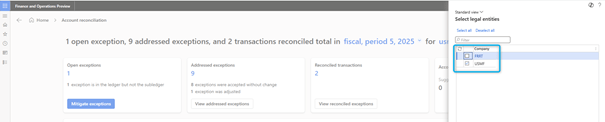
When you open the workspace, it will automatically select the current fiscal period, all legal entities where transactions exist and for all areas (modules).
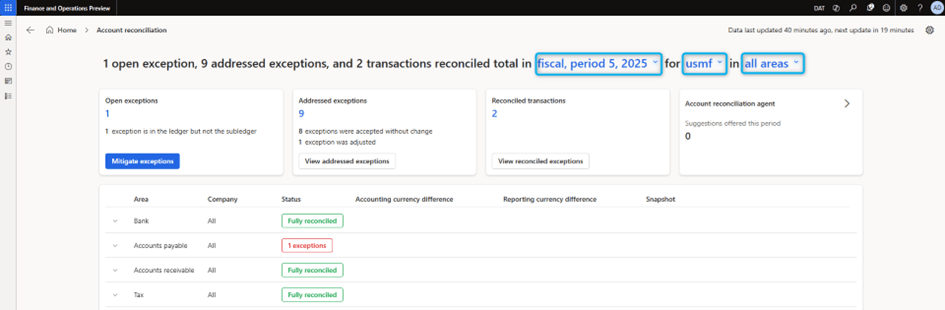
But you can change these default values and select your own.
For now, only four modules are covered:
- Bank
- Account Payable
- Account Receivable
- Tax
Where you can see it:
- The status, whether it has been fully reconciled or exceptions exist for which company.
- The differences in accounting or reporting currency.
- A hyperlink to a snapshot shows a snapshot of data for the selected combination of a module and legal entity for the selected period. The snapshot provides a final summary of all data for the period, including automatically reconciled transactions and any exceptions that were addressed.
- The snapshot is available only for ledger calendar fiscal periods that are marked as on hold or permanently closed, and that are fully reconciled. The snapshot is generated through the same background process and on the same schedule.

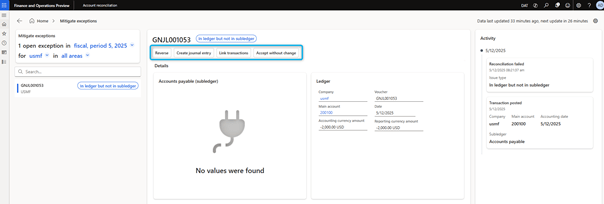
Open Exceptions will display any mismatch that can exist. This can be either the transaction has been posted to ledger and not in subledger or any differences in accounting and reporting currencies. The actions that are available vary, depending on the exception.

If the exception is In Subledger not in ledger, the following actions are available:
- Create journal entry – Go to the general journal, where you can create an adjusting entry to address the exception.
- Link transactions – Open the Link transactions page, where you can link transactions that are in the subledger but not in ledger and transactions that are in the ledger but not in the subledger.
- Accept without change – Accept the exception as is and clear it. This action is often used when the difference is a small amount or a rounding difference.
- View exception history – View the history of the exception.
If the exception is In Ledger not in subledger, the following actions are available:
- Reverse general ledger voucher – Create a reversing entry for the ledger voucher. This will not reverse the entry automatically but instead will open the form where you can reverse the entry.
- Link transactions – Open the Link transactions page, where you can link transactions. This will allow you to link your ledger transaction to an open subledger transaction and vice versa.
- Accept without change – Accept the exception as is and clear it. This action is often used when the difference is a small amount or a rounding difference. By accepting the changes, it will no longer be shown as an exception.
- Create adjusting journal entry – Go to the general journal, where you can create an adjusting entry to address the exception.
If the exception is Amount mismatch, the following actions are available:
- Accept without change – Accept the exception as is and clear it. This action is often used when the difference is a small amount or a rounding difference.
- Create adjusting journal entry – Go to the general journal, where you can create an adjusting entry to address the exception.
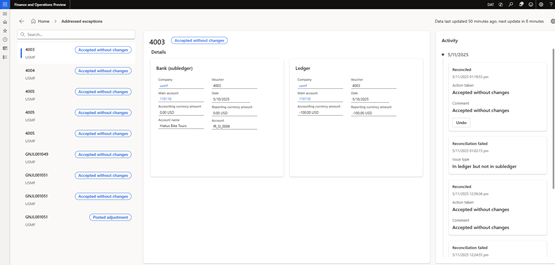
Addressed exceptions means that you have taken at least one action regarding the open exception.

Reconciled transactions: An adequate action has been taken to reconcile the transaction.
In this tile you will see any suggestions from the agent. For now, this feature is not available and will be in a future release.

If you previously marked an exception as addressed but want to change the way that you addressed it, you can undo the last action. When you undo an addressed exception, the exception is moved back to the list of open exceptions. You can then act again.
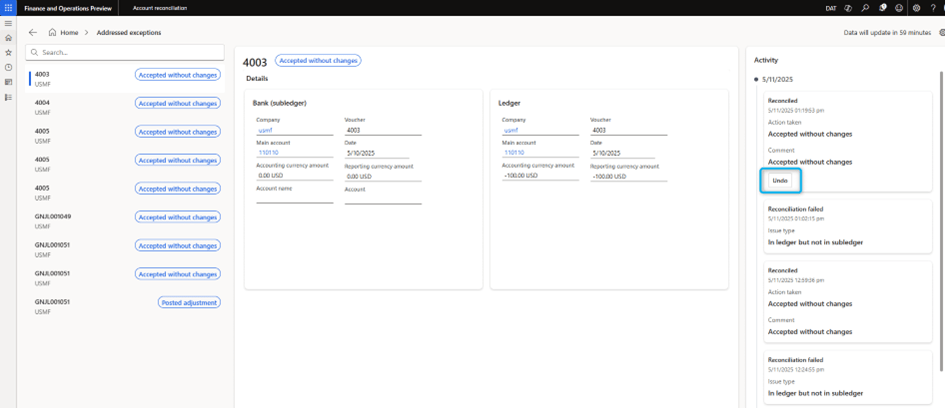
To undo an addressed exception, select Undo. You are prompted for a reason. Enter a reason, and then select OK to continue.

Leave a comment