
- PowerShell
- Power Platform Link
- Dataverse setup
- Set up agent identity users and assign security roles
- Assign permissions to users
- Create Connections
- Activate Feature
- Synchronize mailboxes with Dataverse
- Activate the flows
PowerShell
PowerShell version 7 is required.
Power Platform Link
Make sure that your Finance and operations environment is connected to Dataverse. In LCS verify in Power Platform Integration that you have an environment ID and Url:

Or in PPAC > Environments and select the environment used:

Normally you have an URL for Finance and Operation.
Dataverse setup
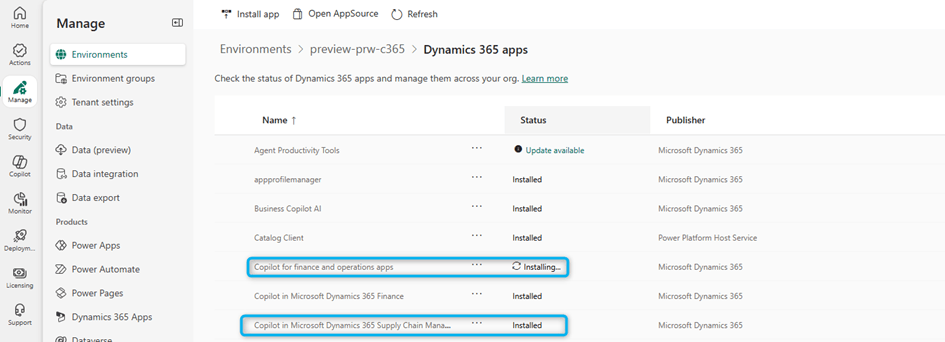
These two applications must be installed in Dataverse for your selected finance and operations environment:
- Copilot for finance and operations apps version 1.0.3048.2 or later
- Copilot in Microsoft Dynamics 365 Supply Chain Management version 1.1.3046.2 or later
In PPAC > Environments and select the environment used, click on Resources and Dynamics 365 Apps:

And next click on Install app button:
Set up agent identity users and assign security roles
The Supplier Communications Agent interacts with Dataverse and Microsoft Copilot Studio to do its work. You must select the identity that is used for these interactions and create the required connections. Create agent identity user accounts in both Dataverse and Finance. Create a dedicated agent identity to ensure secure and maintainable operations.
The Suppler Communications Agent utilizes premium tier connectors, so the agent identify user must have a license that permits those. Examples of sufficient licenses include Power Apps Premium, Power Automate Premium or Dynamics 365 Supply Chain Management.
The user accounts must have the following security roles:
- Required Dataverse user roles:
- Finance and Operation
- Basic User
- Supplier Communications Agent
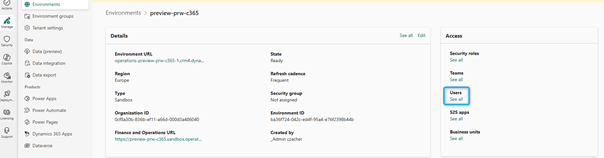
In PPAC > Environments and select the environment used, click on Users.
Select the user and Manage security Roles :

Add Roles:

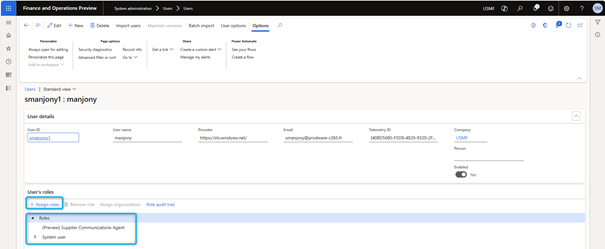
- Required Finance user roles:
- (Preview) Supplier Communications Agent
- System user
In System administration > Users > User > Assign Roles
Assign permissions to users
All Dynamics 365 Supply Chain Management users working with the agent must also be created as Dataverse users (if they are not already).
Additionally, they be assigned the roles described in the following subsections.
Users who manage the agent configuration
- Required Dataverse user roles:
- Basic User
- Finance and Operations Agent Configuration Manager
- Finance and Operations Basic User
- Required Supply Chain Management user roles:
- System user
- Purchasing manager and/or Purchasing agent
Users who review agent results
- Required Dataverse user roles:
- Basic User
- Finance and Operations Basic User
- Required Supply Chain Management user roles:
- System user
- Purchasing agent
Create Connections
For the agent to communicate between Dataverse and Copilot studio, two connections are needed.
In the Power Apps Maker Portal, as an environment admin:
- Create a Microsoft Dataverse connection using the agent identity.
- Create a Copilot Studio Preview connection with the same identity.
Create required connections and activate the triggering flows:
- Open the Power Apps Maker portal and sign in as an environment administrator user.
- Use the Environment drop-down list in the page header to select the environment associated with your finance and operations apps.
- In the left navigator, select Connections.
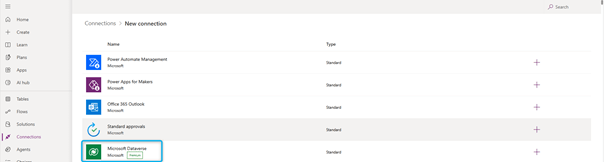
- At the top of the page, select New connection.

- Use the Search field at the right side of the page to find the connection with a Name of Microsoft Dataverse (if you see two, use the one with the green icon). Select Create for that row and follow the instructions on your screen. Sign in with the intended agent identity user when prompted.
- You return to the Connections list. Your new connector is now shown at the bottom of the list and is named after the agent identity you signed in with when creating it.
- At the top of the page, select New connection.
- Find the connection with a Name of Microsoft Copilot Studio (preview). Select Create for that row and follow the instructions on your screen. Sign in as the intended agent identity when prompted.


- You return to the Connections list. Your new connector is now shown at the bottom of the list and is named after the agent identity you signed in with when creating it.

- To finish setting up agent identity, you must update the agent’s connection references so that they point to the connections that you created. You must also activate the triggering Power Automate flows.
Activate Feature
You must be running Microsoft Dynamics 365 Supply Chain Management version 10.0.44 or later, with all available quality updates.
The following features need to be activated before going any further. In Feature Management Activate (Preview) Immersive Home

Next Activate (Production Ready Preview) Agent management:

Next Activate (Production Ready Preview) Supplier Communications Agent:

All these features are in Preview.
Synchronize mailboxes with Dataverse
To enable the email analysis and delivery features of the Supplier Communications Agent, you must set up targeted mailboxes so that they are synchronized with Dataverse at the server level.
Private mailbox
Only the owner of a private mailbox can create an agent configuration and review agent results that are related to it. The owner must have permission to manage the agent configuration and review agent results.
To set up a private mailbox, follow these steps:
- Sign in to the Power Platform admin center as a user who has a system administrator security role. (Although users who do not have an administrator role can enable synchronization for their own mailboxes, administrator approval might be required.)
- Select the environment that you want to set up.
- On the command bar, select Settings.

- On the Settings page, under Email, select Mailboxes.

- On the Select a view dropdown menu at the top of the page, select Active Mailboxes.
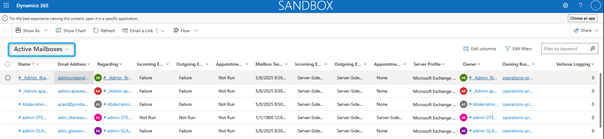
- Select the checkbox for each mailbox that you want to use with the Supplier Communications Agent.
- On the command bar, select Test & enable mailbox to enable synchronization for the selected mailboxes.

After a private mailbox is set up, the user who owns it must update the personalization settings to specify that all emails should be tracked.
To enable tracking of all emails for a private mailbox that you own, follow these steps:
- Go to the URL of your environment.
- Select the Settings button (gear symbol) in the upper right, and then select Personalization Settings.
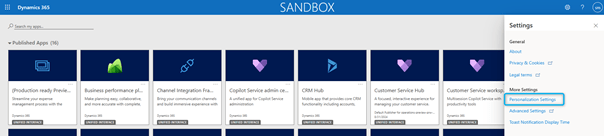
- In the Set Personal Options dialog, on the Email tab, in the Track field, select All email messages.

- Select OK.
Shared mailbox
If you are using a shared mailbox, create a queue so that all users who work on the shared mailbox can access email contents.
- Sign in the Power Platform admin center as user who has a system administrator security role.
- Select the environment that you want to set up.
- On the command bar, select Settings.

- On the Settings page, under Users + permissions, select Teams.

- Select Create team.
- In the New team dialog, specify a name, business unit, and administrator as required. Set the Team type field to Owner.
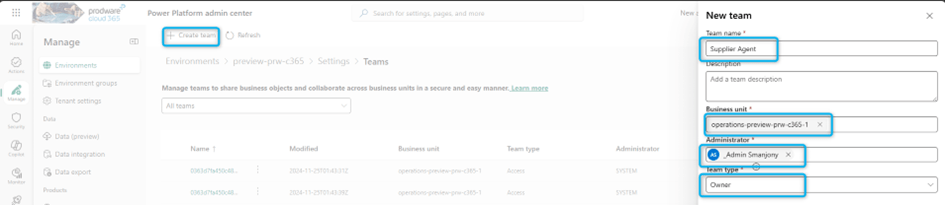
- Select Next.
- In the Add team members dialog, add all the users who should have access to the shared mailbox.

All users who create an agent configuration and review agent results that are related to this mailbox must be added as team members.
- Select Next.
- In the Manage Security Roles Dialog, select Finance and Operations Basic User and Basic User, and then select Save.

- Return to the Settings page for your environment, and then, under Business section, select Queues.
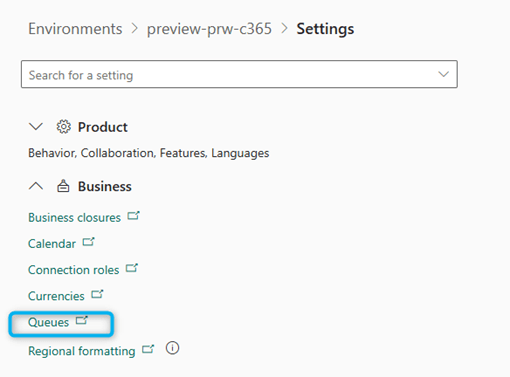
- Select New to create a Queue entity record.
- Enter a name, set the Incoming email field to the email address of the shared mailbox, and set the Owner field to the team that you created earlier.
- Select Save.

- A mailbox should now be created in the Email settings section. Select the mailbox name.

- On the command bar, select Test & Enable Mailboxes.
If this operation fails, review the Alerts section for the mailbox. If it includes an error message that states that approval is required, you must ask your global or Exchange admin to approve the mailbox.
- Ensure that no other mailboxes that have the same email address are set up and active.
- Return to the Settings page for your environment.
- Under Email, select Mailboxes.
- On the Select a view dropdown menu at the top of the page, select Active Mailboxes.
- If any other mailboxes have the same email address as the shared mailbox email address, deactivate them.
Activate the flows
To finish setting up the agent identity, you must activate the triggering Power Automate flows. A Canvas app is provided to help you do this. To use the app, follow these steps.
- Sign in to Power Apps as an environment administrator user.
- In the left pane, select Apps.
- Select the app with a Name of (Production ready preview) Setup Supplier Communications Agent.
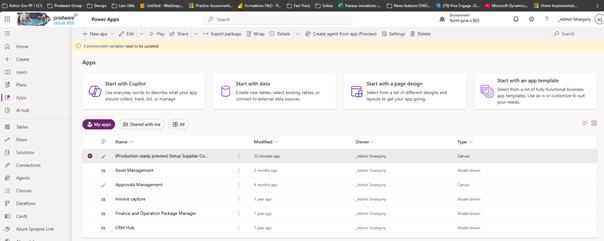
- On the command bar, select Play.
- Under Connections, select the connections you created in the previous section for both Microsoft Dataverse and Microsoft Copilot Studio.
- Select Apply at the bottom-right of the page and wait for all of the flows listed under Agent trigger flows status to switch to a state of Activated.


Leave a comment