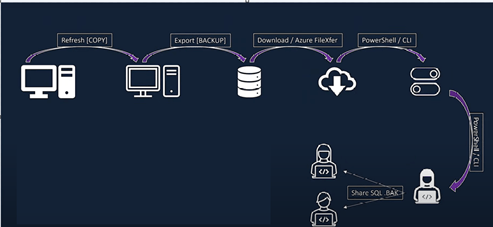
When we implement a project, we need to make copies. We have user interface and automation options. In LCS, we could only copy the database. When you send your production data to your sandbox or development environment, you obviously get the data, but you still need to apply packages. With the Power Platform and the administration center, it copies code and data. The copy functions allow for copying LCS environments to PPAC or from PPAC to PPAC.
These copies of environments can also be automated through the Devops via Pipelines. Automation can be done end to end from Production to the development environment or sandbox overnight and I do not even need to use my individual account. I can use the service principle with minimum setup.
Full Copy
Previously in LCS we had this to copy data from a sandbox environment to a development environment, it took a lot of time, there were limits on the size of the database and the code was not copied:
In PPAC there is now the option to copy the data and code. So, in a few hours, you copy the data and code from production to a development environment that is also managed by Microsoft through this process. In a few hours you have a complete replication of the production to debug. In the code you have both the standard but also ISVs and customization. However, we have the same limitations as for LCS copies (example of truncating emails). It also copies all data stores, the Dataverse database, Dataverse files. We really have a complete environment.
Power Platform Admin Center
To make this copy all you must do and put yourself on the source environment and click on the Copy button. It will open the dialog. Enter the name of the target environment and then click on Copy and confirm. This process will put the environment in admin mode.

In the cursor window that appears, choose to copy All, which integrates both the Dataverse and X++ source code, as well as the data from the source. Select the target environment as the unified development environment.
Power Shell
Load the PowerShell console in Administrator mode and run the following commands to copy the environment.
All Commands:
#Install the module
Install-Module -Name Microsoft.PowerApps.Administration.PowerShell
# Set variables for your session
$TenantId = “YOUR_TENANT_GUID_FROM_Microsoft Entra ID”
$SPNId = “YOUR_AZURE_APPLICATION_REGISTRATION_CLIENT_ID”
$ClientSecret = “YOUR_AZURE_APPLICATION_CLIENT_SECRET”
$SourceEnvironmentID = “YOUR_SOURCE_ENVIRONMENT_ID_HERE”
$TargetEnvironmentID = “YOUR_TARGET_ENVIRONMENT_ID_HERE”
Write-Host “Creating a session against the Power Platform API”
Add-PowerAppsAccount -Endpoint prod -TenantID $TenantId -ApplicationId $SPNId -ClientSecret $ClientSecret
$copyToRequest= [pscustomobject ]@{
SourceEnvironmentId = $SourceEnvironmentID
TargetEnvironmentName = “Copied from source”
CopyType = “FullCopy”
SkipAuditData: true
}
Copy-PowerAppEnvironment -EnvironmentName $TargetEnvironmentID-CopyToRequestDefinition $copyToRequest
Copy a D365FO environment from LCS to an UDE environment in PPAC
Before you can copy the LCS source environment, you must perform several steps to ensure that data and code are copied correctly into the target environment. If you do not complete these steps, loss of code or data may occur.
First it is necessary to install two applications in the environment:
Install or update the latest Dynamics 365 Finance and Operations Platform Tools application: This application is required in the source environment as it stores X++ code in Microsoft Dataverse. This allows the code to be copied into the target environment at the same time as the data. Without this, data loss may occur. The following steps are required:
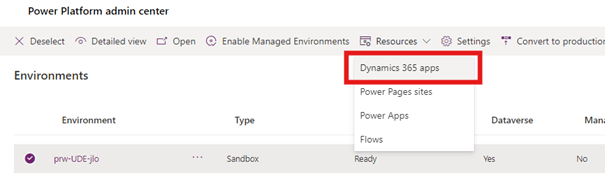
- In the Power Platform administration center, select Environments.
- Select the source environment from which you want to start the copy. From the Resources menu, select Dynamics 365 Applications. You should see Dynamics 365 Finance and Operations Platform Tools in the list of available applications.
If you see Update Available in the Dynamics 365 Finance and Operations platform tool status, select the link, accept the terms, and select Update.
If the tools in the Dynamics 365 Finance and Operations platform are not listed, select Install the application to add this application to your organization.
In the list on the right side, locate and select the Dynamics 365 Finance and Operations Platform Tools application, select Install and follow the installation instructions.

Convert the Finance and Operations application packages to the new unified package format: This step converts the existing software deployable package, used by Lifecycle Services, into a new unified deployment package format.
Run the following command using ModelUtil.exe from Windows PowerShell. You can find the .exe file in PackagesLalDirectoryDev/bin.
.\ModelUtil.exe -convertToUnifiedPackage -file=<PathToYourPackage>.zip -outputpath=<OutputPath>
Download the unified deployable package to the source environment: This allows customizations to be downloaded and saved in the Dataverse storage so that they can be copied.
- Install PAC CLI.
- Authenticate and log in to the Dataverse source.
- Run the following command:
- pac auth list
- pac auth select –index 1
- pac package deploy –logConsole –package <OutputPath>\<Package>.dll
Finally, make the environment copy either via PPAC by accessing the source environment then click on copy, select all and choose the destination environment. By using PowerShell scripts.
Copy without transactions
Another nice feature is the copy without transaction. As they move to the cloud, capacity has become a major concern for customers, and they must manage their overall capacity well on their tenants to ensure they are under-capacity and compliant. In PPAC, customers can copy production across multiple sandbox environments, and this increases total storage consumption: we will double it, triple it, quadruple it. This copy without transaction is there to solve this problem of capacity consumption in part.
You can copy the minimum amount of data that corresponds to configurations, master data, and references. Transactions represent the largest volume of the database and assume most of the space. You bring your customers, your products, and your references, say the payment terms, but you do not take transactions, like sales orders.
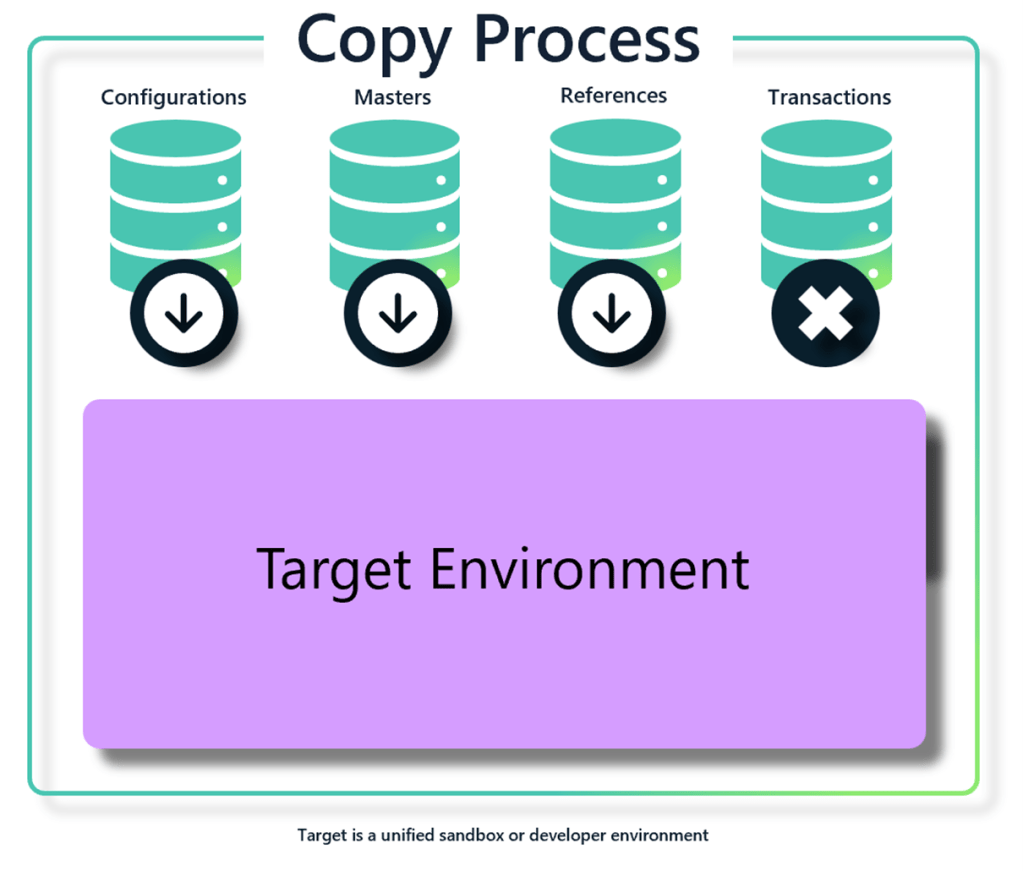
You will need full copies of the Production only to fix bugs.
This feature can help in cases of capacity issues by reducing the volume on test or development environments. This copy without transaction is now supported by PowerShell and can of course be automated via Devops. The larger the source, the bigger the economy.
To ensure that the resulting environment is still functional after the copy is completed, all transactional tables must be cleared together. Due to the standardized schema of the Finance and Operation applications, ignoring even one table in an attached relationship can cause disruptive behavior in the user interface and business logic after copying is complete.
Using the metadata present on X++ tables, all transaction tables and their associated tables can be truncated as part of a copy without a transaction. This includes custom tables and tables from ISVs, provided that the Table Group property is one of the following:
- Transaction (4)
- Worksheet header (5)
- Work Sheet (6)
- Worksheet (9)
- Transaction header (10)
- Transaction line (11)
- Stage Design (12)
To use this feature, your source and target must be in the same region and the table meta data must be correctly populated to define those that are typed as transactions. Table group metadata is used to dynamically determine the list of tables that will not be copied to your default target environment. These are the table groups, transaction, transaction header, transaction line, worksheet header, worksheet header, sheet row and step. Before making the copy, it is important to check that this property is correctly filled for ISVs and custom tables.
Run the PowerShell console in Admin mode and execute the following commands to copy the environment.
In the PowerShell script, the ExecuteAdvancedCopyForFinanceAndOperations property manages this feature:
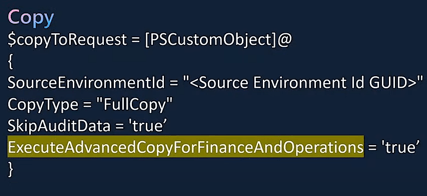
Run the PowerShell console in Admin mode and execute the following commands to copy the environment.
#Install the module
Install-Module -Name Microsoft.PowerApps.Administration.PowerShell
# Set variables for your session
$TenantId = “YOUR_TENANT_GUID_FROM_Microsoft Entra ID”
$SPNId = “YOUR_AZURE_APPLICATION_REGISTRATION_CLIENT_ID”
$ClientSecret = “YOUR_AZURE_APPLICATION_CLIENT_SECRET”
$SourceEnvironmentID = “YOUR_SOURCE_ENVIRONMENT_ID_HERE”
$TargetEnvironmentID = “YOUR_TARGET_ENVIRONMENT_ID_HERE”
Write-Host “Creating a session against the Power Platform API”
Add-PowerAppsAccount -Endpoint prod -TenantID $TenantId -ApplicationId $SPNId -ClientSecret $ClientSecret
$copyToRequest = [pscustomobject ]@{
SourceEnvironmentId = $SourceEnvironmentID
TargetEnvironmentName = “Copied from source”
CopyType = “FullCopy”
SkipAuditData: true
ExecuteAdvancedCopyForFinanceAndOperations: true
} Copy-PowerAppEnvironment -EnvironmentName $TargetEnvironmentID –
The above PowerShell command runs a full copy between the source environment and the target environment, which allows you to copy code, software, master data, and reference. Transaction tables are then truncated before the environment is made available to the administrator.
This may take time. You can see it in the power platform admin center.
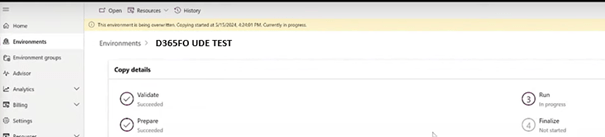
In LCS we have the maintenance mode. The new name for this is the administration mode in the power platform administration center (already existing concept on the Dataverse side). You go to on the environment, click edit, the administration mode active and only the admin to make changes currently.
Backup
It is possible to make backups: for the production we can do it on the last 28 days and on the sandbox on the last 7 days.

Restore
The way restoration works is simple. You click restore or manage. This restores works in point-in-time mode. It takes the latest backup systems. But if you have manual backups, you can use them to restore to that date. As the copy, it will bring the code and data.

Delete
Deleting an environment is a common action taken by administrators to recover capacity for other purposes. An environment can be removed using the Power Platform admin center or PowerShell as follows.
Power Platform Admin Center
Deleting is simple too. All you need to do is go to the environment, click delete, provide the name of the environment and it will be deleted. It will be added to the list of deleted environments. So, you do not create the environment with the same name immediately because this URL will be assigned, and it takes some time to reassign it. It takes at least 24 hours to make sure if you want to reuse the same environment URL.
Select a specific environment, then select the Delete button in the action bar at the top of the page.
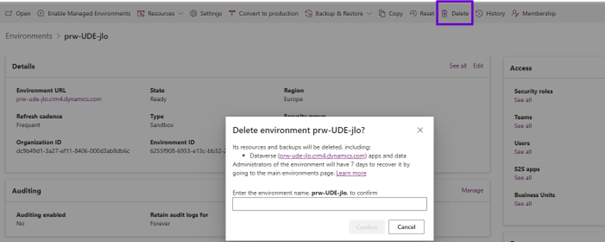
Confirm that you want to remove the environment and continue. This starts the delete process and releases the Dataverse and Operations storage consumed by this environment for other needs.
PowerShell
Use the following script to remove the previously created environment. Set the environmental ID appropriately.
#Remove the previously created environment by ID
Remove-AdminPowerAppEnvironment -EnvironmentName [Guid]

Leave a comment