
Project Overview
The integration wizard makes it easy to create an implementation project in real time, so you can get implementation guidance and create reviews. You can also join an existing project if you are already a member. The wizard guides you through the process of creating a project, adding users, and configuring project details.
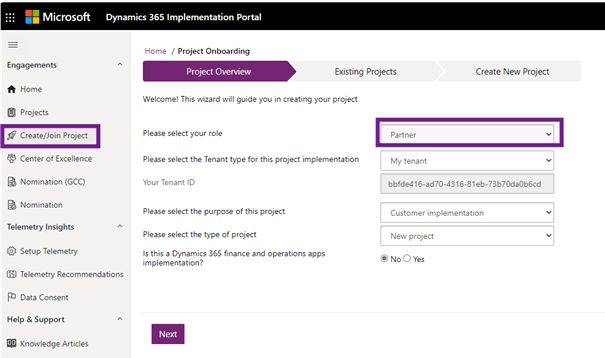
The first step in the integration wizard is to provide basic details of your project.
Specify your role:
- Partner: choose this option if you are a partner and you integrate the project for your client.
- Client: Select this option if you do not have an implementation partner or if you are running the implementation project as a Microsoft client.
Specify the type and ID of the Microsoft Entra tenant for which your implementation project is intended.
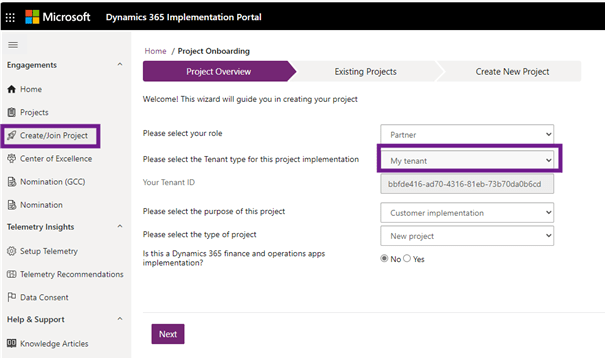
For projects with Finance and Operations applications, you can find the tenant ID in Lifecycle Services. If you choose the option Different Tenant, then you must get consent to data sharing.
- My Tenant: Select this option if you are signed in to your implementation project as your tenant. The tenant ID appears in the Your Tenant ID field.
- Different Tenant: Select this option if you are creating a project in a different tenant than the one you are signed in to.
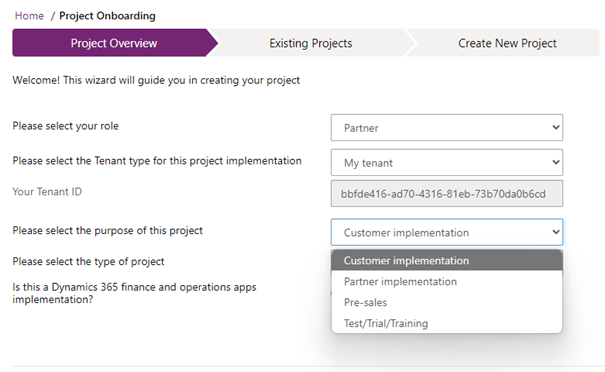
Specify the purpose of the project:
- Customer implementation: Choose this option if your implementation project is being implemented by a Microsoft partner for a customer, or if you are a customer of Microsoft and implementing Dynamics 365 without a Microsoft partner.
- Partner implementation: Choose this option if your project is being implemented for a Microsoft partner, such as when you implement Dynamics 365 for your own organization as a Microsoft partner.
- Pre-sales: Choose this option if the project is being created as part of the pre-sales phase.
- Test/trial/training: Choose this option if your implementation project is created as a trial, for testing, or for training purposes.
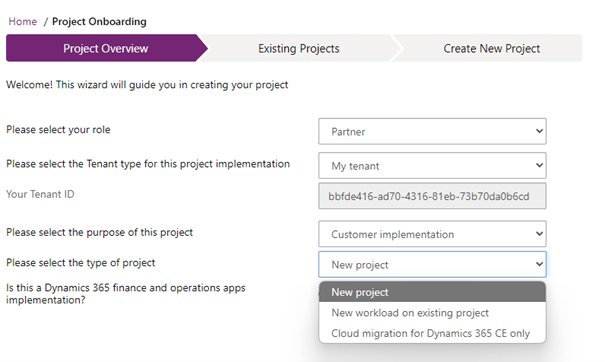
Select the project type:
- New project: Select this option if this is a new implementation.
- New workload on existing project: Select this option if you are implementing a new workload on an existing project. If there is already a project that has gone live, and you are adding another app to the existing implementation, choose the new workload on existing project option.
- Cloud Migration for Dynamics 365 CE only: Select this option if the project is for a cloud migration project for a Dynamics 365 Customer Engagement (on-premises) solution.
Is it an implementation of Dynamics 365 finance and operations applications?
- Select No if you do not have any finance and operations applications involved (such as Finance, Commerce, Supply Chain Management or Human Resources).
- Select Yes if you have one or more finance and operations applications affected.
Selecting Yes in the above option loads theFinance and Operations Lifecycle Services Project section.
Finance and Operations LCS Project – For the initial deployment of the implementation project with the relevant Finance and Operations applications, when a project is created in Lifecycle Services, The FastTrack team automatically creates a project in the portal and customers and partners can join. It is not necessary to recreate the project if it already exists.
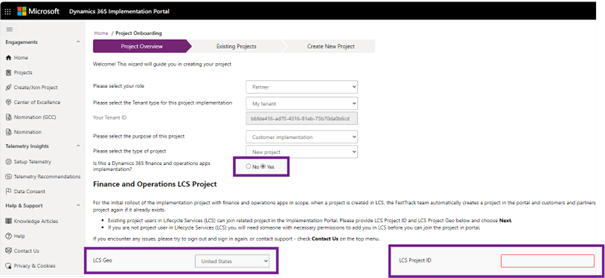
- LCS Geo: Select the right GEO where Lifecycle Services is deployed.
- LCS Project ID: Provide the Lifecycle Services project ID related to this implementation project. If you proceed to create a new project, this Lifecycle Services ID is linked to the newly created project.
Existing project users in Lifecycle Services can join the associated project in the implementation portal (if one exists). If you are not a project user in Lifecycle Services, the associated implementation project will not appear on the next screen. You will need someone with the necessary permissions to add you in LCS before you can join the project in this portal.
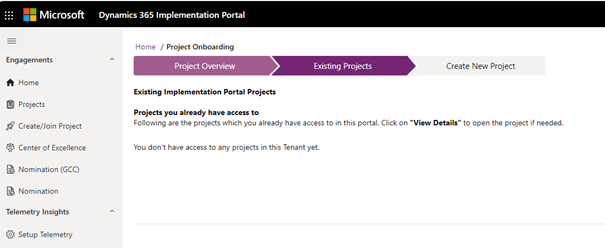
Existing projects
Select the Next button to go to the Existing Projects page.
This page displays existing projects based on the tenant ID and life cycle services ID, if applicable. This page is divided into two sections.
View existing projects
List of existing implementation projects that you are already part of. You can select View details for each project to open the project-specific information.
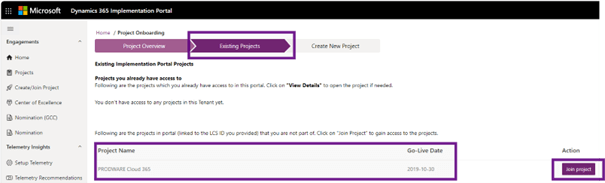
Join an existing project
Only appears if you have selected Yes for Finance and Operations and provided a valid Lifecycle Services ID. Two conditions are validated:
- If the Connected User ID (UPN) is a project user in the given Lifecycle Services instance.
- If there is an associated implementation project related to the LCS ID, of which the logged-in user is not part.
If both conditions are met, projects will be displayed with a Join Project button. Select the button to add users to the project and open the Project summary screen.
If you are not a project user in the given Lifecycle Services ID and an associated project exists, the details of the project are not visible. You must contact someone with appropriate access to add you to Lifecycle Services and revisit the onboarding wizard to join the implementation project.
Create a new project
If your implementation portal project does not exist and/or you want to create a new project, go to the third step of the wizard. This page collects the details of the project and creates the project.
Project details
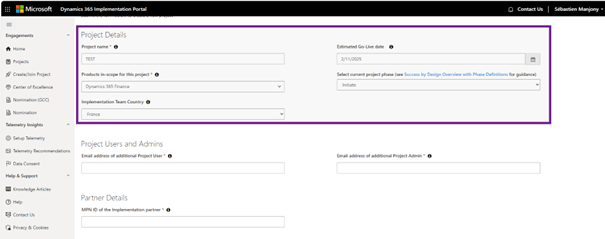
- Project name: Provide a descriptive name that reflects components such as the customer’s project name, deployment region, and main apps that are in scope.
- Products in-scope for this project: Select all products and apps that are in scope for the implementation. The implementation guidance in the portal populates depending on the products selected here.
- Implementation team country: Select the country where the bulk of the implementation team is located. This helps MS scope the project.
- Estimate go-live date: Select the planned/best estimate of the go-live date. This date should be a future date and cannot be in the past.
- Select current project phase: The project phase follows Success By Design phases. Once the project is created, this field is not editable for finance and operation apps’ implementation project but would be editable for all other projects. If necessary, you can update all the above details in the portal after project creation using the View/Edit Project Details option.
Project users and admins
You (or any Project Admin) will be able to add/remove users from the project using the Admin tab > Project Users page once the project gets created.

- Email address of additional project user: Enter email address of another user in the format name@company.com. This user is added as a project user in the newly created project.
- Email address of additional project admin: Enter the email address of another user in the format name@company.com. This user is a project admin in the newly created project in addition to the user creating the project. This is to ensure that there’s coverage for the admin activities.
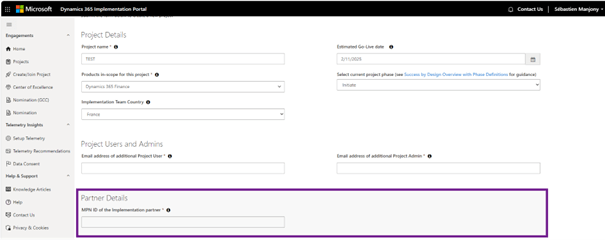
Partner details
Both fields can be modified once the project is created via the View/Edit Project Details option. The toggle button Do you have an implementation partner? is not visible if you are a partner or create the project as a partner and the MPN ID is a mandatory field in these scenarios.
- Do you have an implementation partner: Toggle this option to No if you do not have any implementation partner. Marking this as Yes will make the next field mandatory.
- MPN ID of the implementation partner: Specify the MPN ID of the partner who is implementing the project. This ID is linked to the project.
Consent to sharing data.
This section will only load if you selected Different Tenant as the tenant type at the beginning of the integration wizard and it is not a test/trial/training project.
There are two fields for this section and accepts an email/field in name@company.com format.
- Target Tenant Reviewer 1 Email
- Target Tenant Reviewer 2 Email
After providing the email addresses, select the Click here field to confirm that the emails provided are actual users of the target tenant’s corporate owner organization, not outsourced users.
Once you have entered the details, select the Create a project button.
Create project
When you select the Create Project button, an email is sent to both reviewers of the target tenant for them to approve access to the project with the direct link and other details. While the project is being created in the background, details such as the tenant client name and telemetry information will not be resolved until the reviewers of the tenant client have approved access.
The person creating the project can cancel the request and edit the approvers’ emails from the Data Consent page after the project is created.

Leave a comment