
Introduction
OData is a standard protocol uses REST based CRUD(Create, Read, Update, Delete) operations by exposing Data Entities.
Preferred:
- Real Time Update is required
- Low Volume of Data
- Simple CRUD
Avoid:
- High Data Volume
- Complex Business logic
OData Set up Guide in Postman
Step 1: Authentication & Setup
Before we move data, we must establish a secure handshake between your external application and D365 Finance & Operations.
Azure & D365 Configuration
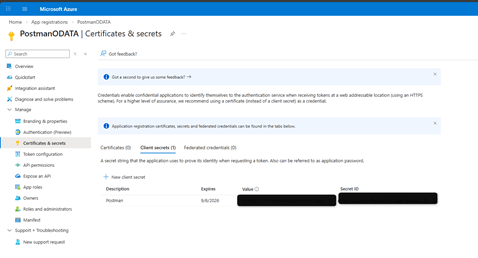
- App Registration: In the Azure Portal, register a new application under Microsoft Entra ID. Capture your Client ID and Client Secret.
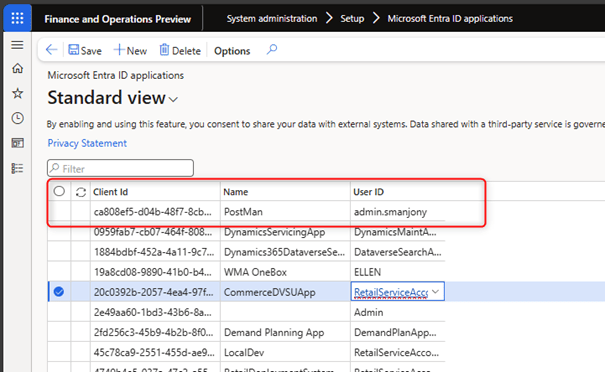
- D365 Mapping: Navigate to System Administration > Setup > Microsoft Entra ID Applications. Register your Client ID here and map it to a user with sufficient permissions (e.g., Data Management Manager).
Automating the Token in Postman
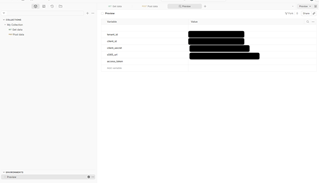
Create a Postman Environment and add these variables:
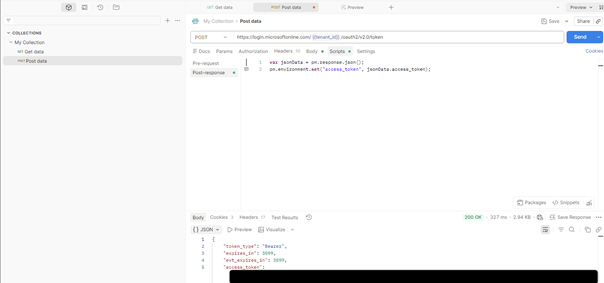
To avoid manually copying tokens, use a POST request to:
https://login.microsoftonline.com/{{tenant_id}}/oauth2/v2.0/token
Headers :
| Key | Value |
| Content-Type | application/x-www-form-urlencoded |
Body → x-www-form-urlencoded :
| Key | Value |
| client_id | {{client_id}} |
| client_secret | {{client_secret}} |
| grant_type | client_credentials |
| Scope | https://{{d365_url}}/.default |
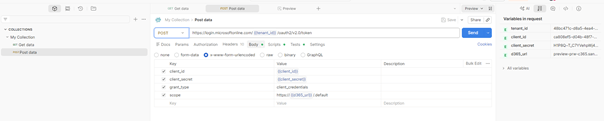
Use the Tests tab in Postman to automatically store your token in an environment variable:
var jsonData = JSON.parse(responseBody);
pm.environment.set(“access_token”, jsonData.access_token);

Step 2: Setup Postman Request To D365 Data Entity
- Create a GET request and Specify the following text in the URL field. Replace <D365 URL> with the URL you use to access the D365 environment.
https://<D365 URL>/data/CustomersV3
2. In the Headers tab, specify the Authorization Key Value Pairs (attention to space).
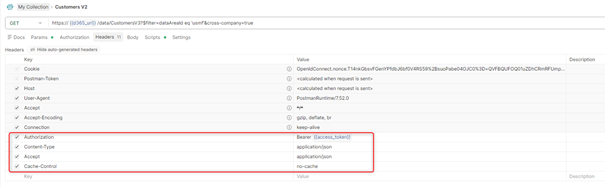
3. Click ‘Send’
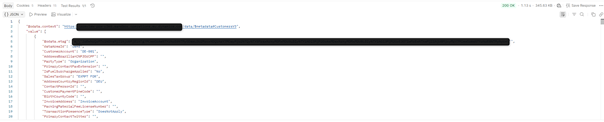
If you set things up correctly, you will get a response with a Status of 200 Ok. And you will see customer data returned as JSON text in the response.
OData Endpoints

Supported Features of OData
- CRUD support is handled through HTTP verb support for POST, PATCH, PUT, and DELETE.
- The OData service supports serving driven paging with a maximum page size of 10,000.
- Available query options are:
- $filter
- $count
- $skip
- $orderby
- $top
- $expand
- $select
These above 7 queries expression used in the OData URL. Let learn more above it with an example.
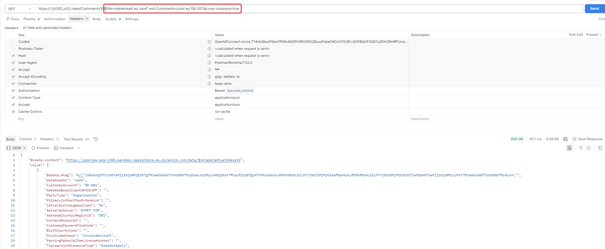
$filter
In an OData endpoint URL, $filter is a query option used to apply filters and retrieve specific data based on defined conditions. It allows users to limit the results returned by the query by specifying criteria for filtering data entities.
Syntax Example:
https://<D365 URL>/data/ CustomersV3?$filter=dataAreaId eq ‘usmf’ and CustomerAccount eq ‘DE-001’&cross-company=true
Explanation:
- $filter: Indicates that a filter condition is being applied.
- CustomerAccount eq ‘ DE-001’: Retrieves only the records where Customer Id is equal to DE-001.
- dataAreaId eq ”usmf ‘: Retrieves only the records where dataArea Id is equal to USMF
Common Operators in $filter
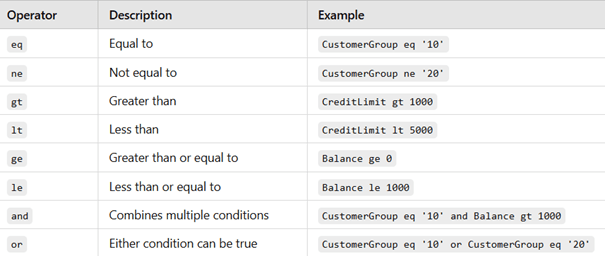
$filter – Calling through POSTMAN tool
$count
In an OData endpoint URL, $count is a query option used to retrieve the total number of records that match a query, without fetching the full dataset. It is useful for pagination, reporting, or when you need to display record counts.
Get the total count of all records in the CustomersV2 entity
https://<D365 URL>/data/CustomersV3?$count=true&cross-company=true
$count – Calling through POSTMAN tool
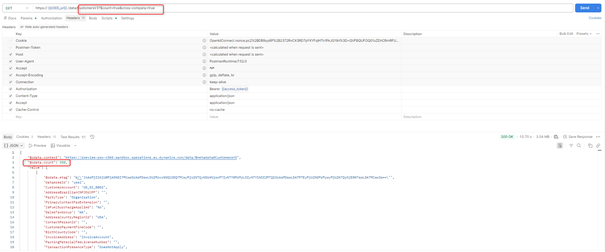
This returns the total number of records in the CustomersV3 entity. Here 350 is our total count.
$Skip
In an OData endpoint URL, $skip is a query option used to skip a specified number of records before returning results. It is commonly used for pagination, allowing users to fetch data in chunks rather than retrieving all records at once.
Usage Examples
Example 1: Skip the first 10 records and retrieve the next set.
https://<D365 URL>/data/CustomersV3?$skip=10
Example 2 Use $skip with $top: This returns 10 records after skipping the first 20 records.
https://<D365 URL>/data/CustomersV3?$top=10&$skip=20
Example 3 Use $skip with $count: This returns 2 records after skipping the first 2 records and also return the total number of records count.
https://<D365 URL>/data/CustomersV3?$count=true&$top=2&$skip=2
$Skip – Calling through the POSTMAN
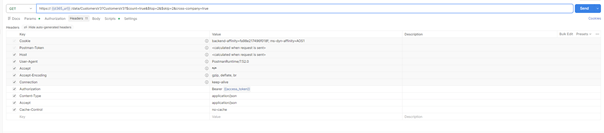
In the Postman tool screenshot above, the response returns the total record count along with two customer records—specifically, the third and fourth records—after skipping the first two customer records.
$orderby
In an OData endpoint URL, $orderby is a query option used to sort the results based on one or more fields. It allows you to specify the sorting order (ascending or descending) for the data returned from the query.
Syntax
https://<D365 URL>/data/CustomersV3?$orderby=CustomerName asc
Common Sorting Options:
- Ascending (asc): Sorts from smallest to largest, or alphabetically from A to Z.
- Descending (desc): Sorts from largest to smallest, or alphabetically from Z to A.
$orderby – Calling through the POSTMAN
$top
In an OData endpoint URL, $top is a query option used to specify the number of records to retrieve from the dataset. It allows you to limit the amount of data returned by the query.
Syntax
https://<D365 URL>/data/CustomersV3?$top=10
This retrieves the first 10 records from the CustomersV3 entity.
I have already covered the example of $top in conjunction with the $skip query in point 3 above
$expand
In an OData endpoint URL, $expand is a query option used to include related entities (also known as navigation properties) in the response. This allows you to retrieve associated data along with the primary entity in a single request, rather than making separate queries for each related entity.
Syntax
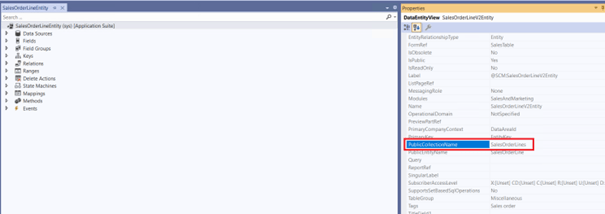
https://<D365 URL>/data/SalesOrderHeadersV2?$expand=SalesOrderLines
“SalesOrderLines” is the public collection name of the entity. You can find the public collection name by opening the entity in Visual Studio, as shown in the figure below.
Use Cases for $expand:
- Retrieve related data in a single API call, reducing the need for multiple requests.
- Optimize data fetching by fetching both primary and related entities at once (e.g., sales order header and lines).
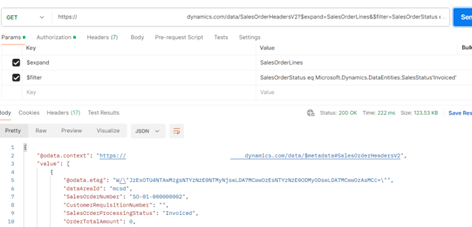
Use of $expand with $filter
Scenario: We need to fetch the list of all invoiced status sales orders with sales line details.
Syntax
https://<D365 URL>//data/SalesOrderHeadersV2?$expand=SalesOrderLines&$filter=SalesOrderStatus eq Microsoft.Dynamics.DataEntities.SalesStatus’Invoiced’
$expand with $filter – Calling through POSTMAN
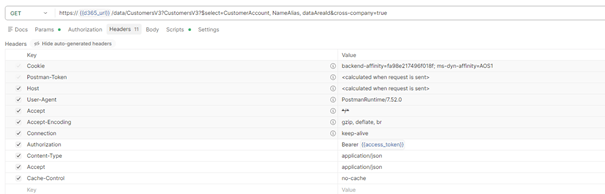
$select
In an OData endpoint URL, $select is a query option used to specify which fields (or properties) of the entity you want to include in the response. By using $select, you can limit the data returned to only the fields you need, which helps improve performance by reducing the amount of data transferred.
Syntax
https://<D365 URL>/data/CustomersV3?$select=CustomerAccount, NameAlias, dataAreaId
This retrieves only the CustomerAccount, NameAlias and dataAreaId fields from the CustomersV3 entity, excluding all other fields.
Use Cases for $select:
- Retrieve only specific fields: When you need data from only a few fields and want to minimize the response size.
- Optimize performance: Reduces data payload when dealing with large entities with many properties.
$select – Calling through POSTMAN

Leave a comment